Sunday, 12 March 2017

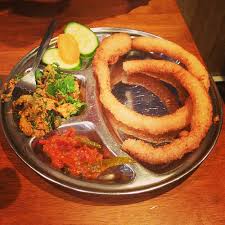
Selroti Popular Nepalese deep oil fried bread


Nepalese Traditional Recipe Sel Roti

About Sel Roti: A Nepali Traditional and Cultural Recipe

Sel-roti, is a bread made up of rice flour and is deep fried into thin, crisp rounds. Sel roti is also termed as Cell Roti, Sel Roti, Cel Roti, Selroti or Celroti and सेल रोटि  in Nepali language. Selroti is one of the most famous Nepalese snack among Nepali in all over the Nepal. Selroti is also used sometime as food in several occasions. But it is specially a Nepalese traditional snacks. Most of Nepalese person like this recipe to eat in any time of the day or night. It is easy to have as snack.
When the word Sel roti is pronounced, Nepalese got water in their mouth. Let’s learn here to cook such a great and tasty Nepalese recipe Sel Roti. This cooking method may help you to cook and make the Selroti.
Celroti is made of Rice flour, water, sugar, oil and ghee. It is one of the most tasty Nepali recipe. Sel Roti is generally served or eaten as confectionery bread. Sel Roti is generally eaten with tea and / or other hot beveragesCel Roti is widely use in the Nepalese festival. This tasty snack is mostly used in the Tihar festival of Nepal. Tihar festival means Deepawali or Diwali. This recipe is essential in Tihar festival. It is said that bhai tika, the last of Tihar festival is not complete without Selroti. Selroti is served to brother by the sisters in this festival. This oily recipe is also used more in wedding parties, anniversary and other traditional and cultural events.

Ingredients

  • 2 cups uncooked rice
  • 3 tbsp. sugar
  • 3 tbsp. ghee (clarified butter)
  • 1/2 cup milk
  • 1 Tbsp. rice flour if the batter is thin (liquid)

Directions

  1. Soak rice overnight.
  2. Drain out water and put rice in mixer grinder along with sugar and ghee.
  3. Grind for about 3-4 minutes until it becomes paste.
  4. If the batter is too liquid, add 1 tbsp. of rice flour.
  5. Cut the top portion of a plastic bottle to drop batter.
  6. Add oil 1/2 inch in a pan and heat.
  7. Drop the batter in oil making round circle. 

  8. Fry until golden brown.
  9. Enjoy!

Chicken Thukpa | Nepali Food Recipe | Anup Kitchen


Rate this Recipe

Thukpa is a popular Nepali and Tibetan noodle soup. Make this soup for lunch or dinner and win your people’s heart.

Ingredients

  • 3 Chicken thighs
  • 1 medium onion
  • 400 g chopped cabbage
  • 50 g green beans
  • 100 g sliced carrots
  • 30 g green chili
  • 15 g chopped cilantro
  • 20 g green onion
  • 4 cloves garlic
  • 3 slice 2 inch long ginger
  • 1 medium lemon
  • 100 g spaghetti or chowmein noodle
  • 2 tsp. cumin and coriander powder
  • 2 tbsp. salt
  • 1 Tbsp. sichuan pepper
  • 2 tbsp. red chili powder
  • 1 tsp. turmeric powder
  • 2 tbsp. olive oil
  • Red chili paste to taste

Directions

  1. Heat a deep pot and add olive oil.
  2. Sauté the chicken thigh and add turmeric powder, coriander and cumin powder, red chili powder, salt and timur which is sichuan pepper.
  3. Sauté for about 5 minutes and then add tomatoes and onions and mix it well for about 2 minutes.
  4. Add hot water enough to cover the chicken.
  5. Add ginger and garlic and cover with a lid.
  6. Cook this broth on medium heat for about half an hour.
  7. In the mean time in another pot bring water to a boil and add handful of salt.
  8. Add the spaghetti or chow mien noodle of your choice and cook as per the package’s instruction.
  9. Once the noodle is cooked, strain out the water and run it through cold water.
  10. Add little oil to the noodle so that it won’t stick together.
  11. Remove the chicken from the broth and then shred out the meat.
  12. Strain out the broth on to a big bowl and discard the paste.
  13. Pour the broth back into the pot and add onions, carrots, green beans, chicken and bring it to boil.

laping noodles nepali style


Boudha is the melting pot of everything that has come to represent Kathmandu – religion, culture, chaos and good food.  Multi-colored prayer flags flutter from the buildings, guttural chants waft the air and the peace that suddenly envelops as you wander the bustling streets is almost surreal.  Stray from the main thoroughfare and you will suddenly end up in an intricate network of gallis, and it is in these hidden alleyways that you will find delicious servings of the relatively unknown lhaphing. 
Try Lhaphing for three main reasons. First for its origins. Lhaphing was originally a Sichuan cuisine called liang fen, that is universally enjoyed as delicious street food across the Tibetan plateau. Secondly for its culture. This Tibetan dish has travelled via northern Nepal with the many Tibetan émigrés who have made Boudha their home.  Here, the taste has been kept alive by the migrants and now the cuisine is finally catching on with Kathmandu locals as well. Third and most importantly, try lhaphing for its scrumptious taste.  A cold summer dish, extenuated by spices, this culinary delight is bound to twist your palate. All in a good way. 
So what is lhaphing like? Lhaphing is a noodle dish seasoned with spices.  The noodle is made from starches extracted either from potato or flour, and is cooked overnight. Once the extract has settled, they are cut and formed into noodles before being dipped in a sauce made from dried chilies and vinegar.  A variety of spices including garlic, cloves, onions and coriander  is thrown in to add to its flavor profile, along with a healthy dose of sesame oil. 
This cold dish takes your taste buds by storm, and is a culinary experience that you will not find anywhere else in the valley.  Couple that with the rich history and culture behind the food, and it makes a mandatory Kathmandu experience. 
The taste aside, lhaphing also makes for a delicious social food. It is light and spicy and you don’t necessarily need an empty stomach to enjoy the dish. It is easy to prepare (thus quickly served) and easier to devour over gossiping and merry making with good company. On your next escapade to Boudha, make sure you hunt down a good lhaphing pasal. I bet it won’t be too difficult!
This cool and spicy dish, especially refreshing in summer, comes to us from the kitchen of our dear friend and excellent cook, Dolkar. A cold jelly noodle dish — originally called liang fen in Sichuan cuisine — laping would not traditionally be made at home. Most people in Lhasa, for example, would buy it from little stalls on the street. Tibetans outside Tibet do make this at home, as there are no laping stalls on most of our city streets!
For 6-8 people
Note: The laping requires at least 4-5 hours to set, and can be prepared the night before and left to set overnight.

Ingredients for the Laping

  • 1 cup of potato or mung-bean starch (For the images here we used potato starch, but we’ve also made it with mung bean starch, and those noodles turn out much stiffer, which you may like, as a matter of personal taste. Mung-bean starch can be found in Korean stores and some other Asian markets.)
  • 5 cups of water

Ingredients for the Sauce

  • 7 cloves of garlic, minced
  • 1 stalk green onion, chopped
  • ¼ cup cilantro, chopped
  • 1 teaspoon salt
  • 1 teaspoon rice vinegar
  • ¼ cup sesame oil
  • ¼ cup soy sauce
  • ¼ cup crushed dried red pepper (We bought this at an Asian store. If you can’t find this, you can cut up dried red pepper, or use chili powder, or a bit of chili sauce. )

Preparing the Clear Noodles

Before heating, stir the starch and water together until you get an even texture.
Heat the mixture on stove top to medium, stirring frequently, for 8-9 minutes, or until the mixture is so thick you can barely stir it. If the mixture is boiling before it thickens, turn down the heat until it stops boiling. When done the texture will be very thick, almost like jello, but it still needs to set.
Transfer the cooked mixture into a clean bowl and let it sit overnight at room temperature. In order to shorten the time for cooling, it can also be placed in the refrigerator for 4-5 hours.
After the laping has set, remove it from the bowl. It should stand up by itself, like a very firm jello.
In Tibet, people grate the laping with a very large grater, but our grater was too small and didn’t really work, so we did what many Tibetans do, and just cut the laping with a large knife into long strips. 

Prepare the Sauce and Combine with Noodles

  • Mince 7 cloves of garlic
  • Chop 1 stalk green onion
  • Chop ¼ cup cilantro
  • Combine garlic, onion and cilantro with 1 teaspoon salt, 1 teaspoon rice vinegar, ¼ cup sesame oil, ¼ cup soy sauce, and ¼ cup crushed dried red pepper in a small bowl and stir well. This amount of pepper makes it VERY spicy. If you’re not accustomed to spicy food, just add the pepper in very small increments until you hit the right amount for you.)
  • Drizzle the sauce over the laping, then mix gently with a spatula or other flat utensil until the laping is well-coated with the sauce.
Serve as a side dish with any meat or veggie entree, or as a tasty snack on its own.
Note:
  • Strips of cucumber make a fresh, crunchy addition.
  • Some readers have reported success also with using corn starch and potato starch if you don’t have mung bean starch.

Nepali pan cake Pizza(chatamari)

Chatamari

INGREDIENTS

  • For Rice base:
  • 2 cups - Rice flour
  • 3 - eggs (beaten)
  • 1 cup - water
  • 1 cup - Ghee or Butter
  • Salt to taste
  • For Topping:
  • 1/2 lb - chopped/minced Chicken (any other Meat can be used)
  • 1/2 cup - finely chopped Onions
  • 1/2 cup - diced Tomatoes
  • 1 tsp - garlic, minced
  • 1 tsp - ginger, minced
  • 1/2 tsp - freshly ground black pepper
  • Salt to taste
  • 3 tbsps - cooking oil/butter


  • HOW TO MAKE CHATAMARI:

    1. Heat oil
    2. Fry onions, garlic and ginger until light brown. Put in minced meat, salt and pepper.
    3. Add tomatoes just before the meat is done.
    4. Cook until meat is nearly done and keep aside.
    5. Mix rice flour, eggs, water and a pinch of salt to make cake-like batter.
    6. Heat butter over a pan.
    7. Pour in some batter and spread out into a thin crust.
    8. Cover the pan and cook just on one side for a few minutes.
    9. Don't turn onto the other side.
    10. Put the meat topping over it and cook for a few minutes again with lid.
    11. Serve hot with spicy achar or chutney.

    Chicken momo nepal style

    Nepali Chicken and Vegetable Momo – A very popular majestic Nepali dish/snack.
    So, what is Momo?
    WARNING: Nepali Momo is addictive!!
    Momo, Chicken Momo, Buff Momo, Vegetable Momo) is the Nepali version of dumpling. It is a traditional delicacy in Nepal, Tibet, China, Bhutan and certain parts of India. Its filling can be vegetables, chicken, lamb, mutton and more.
    Momo in Nepal and it’s popularity?
    Dal, Bhaat and Tarkari (Lentils soup, Rice and Vegetables or Meat) is the most important meal for any Nepali but lately Momo have become a staple of Nepali food culture. One can find Momo at every corner of the city: on road side stalls, local dining restaurants or high end restaurants. Momo can be eaten as snacks or dinner and can be served on any occasion.
    One interesting thing about Momo is that everyone can get involved while preparing (wrapping). Momo can be wrapped in different shapes and people experiment with the wrapping style all the time. Some people wrap Momo in a triangular shape while others wrap it in a rectangular shape but the most popular one is round shaped Momo. There is also a new fashion of Open Momo in the market now.  Momo is cooked usually by steaming but can also be pan fried (Kothey Momo).  Momo is served with special tomato or sesame based sauce (aachar) that can be mild or hot.
    Momo, traditional delicacy in China and Tibet, were brought to Nepal by Tibetan immigrants. Nepali people have added their own spices and twists to this amazing dish and made it as popular as Dal, Bhaat and Tarkari.
    Types of Momo:
    Steamed Momo
    C-Momo or Chilli Momo (Spicy)
    Kothey Momo (Fried)
    Open Momo
    Fried Momo
    Sweet Momo
    Fried Chilli Momo
    Momo Stuffing:
    Vegetables
    Paneer (cottage cheese) Momo
    Chicken Momo
    Buff Momo
    Pork Momo
    ••Visual preparation of momo
    Recipe, ingredients and method for Chicken Momo

    Ingredients

    • 2 lbs of chicken breast and thigh
    • 1 full white onions
    • 1 bunch scallions
    • 1 table spoon grated ginger
    • Half table spoon grated garlic
    • Half table spoon white pepper
    • 1 table spoon of cumin powder
    • Salt according to the taste
    • 3 table spoon oil (preferably Olive oil)
    • 2 bunch finely chopped cilantro
    • Green Chilli for the Sauce
    • 1 table spoon Sesame seed for sauce
    • 2 lbs of ripe tomatoes                               Instructions to prepare meat and wrapping the momo 
    • Preparing the stuffing: In one big bowl mix all the above ingredients. Make sure it’s thoroughly mixed. Let it sit in the refrigerator for 10 – 15 minutes.
      1. Preparing the patties: You can buy already made patties from some local Indian or Chinese store. That’s what I do.
      2. Wrapping: Please check the video instruction below for wrapping the Momo. Follow the instruction and use your own creativity as well. That’s the fun part of making Momo. Invite your guests to be part of it too.
      3. Steaming: Boil water in Momo streamer. When ready, put Momo on top shelf of the streamer. Steam Momo for at least 15 minutes and not more than 20 minutes on high heat.

      Instructions to prepare momo sauce

      * Fried Sesame seed, Green Chilli, Red Chilli, Ginger and Garlic Paste, Salt, Fresh Cilantro, Cumin see, Turmeric powder
      1. Heat up Oil
      2. Add little Cumin Seed
      3. Add turmeric powder
      4. Fry 4 Red Chilli
      5. Add 10 to 12 tomato chopped
      6. Add 2 green chilli
      7. Add 3 table spoon fried Sesame Seed 
      8. Add ginger garlic Paste 50% – 50%
      9. Cook it until boiled
      10. Add ½ bunch of green cilantro
      11. Add salt to taste
      12. Add 1 teaspoon Garlic for flavor again
      13. Cook few more minutes
      14. Grind
      15. Let it cool
      Preparation time: 35 minute(s)
      Cooking time: 20 minute(s)
      Number of servings (yield): 12 
    • Courtesy ®Himalayan chef


    Yummy 😋 Blood Sausage gyuma: tibetian blood sausage

    Hello friends, today i am gonna share this eastern Himalayan delicacy.
    My friend, Tenzing Barshee la has created a Losar tradition for himself and his family.  Every Losar, without fail, Tenzing la makes Tibetan Tra-gyuma from scratch, and this is something that all of us who visit his home on Losar look forward to.  Every year, we tease him – “have you made the gyuma yet?” … thinking he may have given up on such hard work but no, he’ll usually grin and say, “Yoe tha, yoe tha – Losar la phey sho aa, gyuma tsa-po chig kyag go.”

     The grin and the words have the usual naughty Tibetan double entendre teasing going on.  But such is how traditions are to be kept alive, with spirit and happiness, making it a fun activity.  I couldn’t have been more thrilled when Tenzing la said that he’ll be happy to share his Tra-gyuma recipe with readers of Simply Tibetan Simply Delicious.   Tenzing la says that this recipe was taught to him by his mother-in-law.
    Tra-Gyuma A la Tenzing Barshee la

    Ingredients:
    1 Gallon of Blood (Order frozen blood from your local butcher or some asian markets carry them too).
    2lbs Ground Beef
    4 1/2 cups of rice (uncooked – preferably a thicker grain rice)
    2 cups Oatmeal
    2 lbs (veal or lamb casing) you can also use synthetic casing but this doesn’t have any fat, so the taste will be completely different
    30-40 short 4 inch strings for tying the sausage links
    1 needle or toothpick
    Spices:
    2 Tablespoon Salt
    1 Tablespoon Pepper
    1 teaspoon ground nutmeg (not traditional but Tenzingla’s addition)
    1 Tablespoon ground cumin
    Procedure:  
    1. One day ahead, take the blood out of the freezer and let it defrost completely.
    2. Cook the rice: Cook the rice and then set it aside to cool.
    3. Clean the casing: This is a lot of work and needs a lot of patience and dexterity. You have to pull and scrub under running tap water to get all the nasty intestinal goop of it but at the same time, you have to be careful not to scrub off the fat clinging on the casing. This fat is a necessity for good tasting gyuma.
    4. Reverse the casing: The next step is to reverse the casing, so that the fat is inside and the smooth inside is turned out. Using your finger, folded over one end of the casing like the cuff of a pant. Hold the tip of the folded part, under gentle running tap water and let it fill with water so that the weight of the water will gently pull the casing inside out. Once turned inside out, you have to do another thorough cleaning – to get rid of all the mucous clinging to the outside. Scrub and rinse until the water runs clean. Do this to all the casings. If you find it too long, you can cut it into more manageable lengths.
    5. Gyuma Stuffing: Nicely shake the gallon of blood properly – this helps mix the blood well. When left sitting, blood plasma tends to separate from blood and water and accumulate on the top. So you want to shake it well and then pour the blood into a large deep container or dish. Add the ground beef, cooked rice and the oatmeal. Add the spices and gently mix it together. The consistency will be pretty liquidy.  You have to keep stirring this every now and then, as the blood coagulates very quickly.
    6. Filling the Gyuma: The filling mixture is pretty liquidy, so it can get quite messy. Best to do this in the sink. Attach one end of the casing to the end of a funnel, pull it up and hold it tight. Then start filling by slowly ladling the stuffing into the funnel – you can use a chopstick to push through the filling into the casing. Gently squeeze and push the stuffing down the casing until it is filled all the way till the tip. Once you’re close to the end, gently run your hand over, pushing any air bubbles to the end, and then tie it with a string. Make sure your sausage isn’t filled too much – it shouldn’t be too round, it should be flattish – you should remove some of the filling if it is turning out too fat.  After the casing is completely filled to your satisfaction, you can start making the links.  Starting from the end that is tied,  gently run your hand over, pushing air bubbles and  form the links by tying them every eight inches or so until the end. After every 4 or 5 links, you can tie second knot with the string leaving just a short bit of casing in between the two knots, so you can cut through into two separate sausages for easier handling. 
    7. Boiling: Once all your sausages are filled, fill a large pot with water. Once the water boils, add some of your sausage links. This is when you have to form the sausages, as the filling is quite liquidy, you may find that the sausages have lost their shape as you put them in the pot. You can gently use a spatula or two to coax them back into shape. Let them boil then, and as they rise to the surface, take a needle or toothpick to poke them  – this helps let out any air bubbles in the sausage and also tells you if they are cooked or not. If there is no blood oozing out from the pricks, then the sausage is done. Take them off and let cool. The sausage will darken considerably upon cooling. 
    8. They can be then sliced and fried or eaten or stored.  Please enjoy. 

    Saturday, 11 March 2017

    Ema Datshi bhutan national dish recipe


    Ema datshi is one of the more exotic Himalayan dishes beloved by Tibetans, who sometimes call it churu, or “rotten cheese” soup. The name ema datshi itself is Bhutanese, where it is considered the national dish, and refers to “chili” and “cheese.” 

    Ema datshi can be eaten with rice, or scooped up with pieces of a very unusual traditional Tibetan dish called senkong, a mound of steamed and boiled millet flour (Tibetan: kongtsam, like Kongbo tsampa) used to scoop up the ema datshi. Eating the soup this way is common among the Doeba people of Western Tibet and the Moemba people of Arunachal Pradesh in India. 
    This recipe packs a powerful flavor and is not for the faint of heart, combining mega-hot spiciness with a strong stickiness from the molded cheese. Tibetans joke that if you cook churu, your neighbors all know what’s for dinner.
    In this version of the soup, we use beef and potato, though it is also common in the Tibetan borderlands to use a pork and labu (Asian radish) combination. You can also make a vegetarian version of the ema datshi recipe by using wood ear mushrooms (or almost any kind of mushroom) and ping (crystal noodles) instead of the beef. Just throw the ping in near the end so that they won’t melt down too much in the soup. 
    Serves about 6 people*
    Ingredients:
    1/3 pound of Blue cheese (We used English Stilton and Italian Gorgonzola cheeses) In Bomdilla, this cheese would be cow or dri (female yak) cheese bought from nomads who sell it either fresh or dried. Back in the day, the cheese would actually be rotten, but folks would not get sick from it.
    6 medium red potatoes (Irish potatoes fall apart too easily when we cook the soup)
    2.5 pounds of beef (We used beef top round. You can use any kind of beef basically except ground)*
    10 spicy chilis (We used jalapeno, but would use maybe 6 for a hotter Mexican chili.)
    8 cloves garlic
    3 medium tomatoes (We used Roma)
    10 green onions (green part only)
    2-3 TBS salt
    Optional, but tasty: 1 TSP emma or yerma (Sichuan pepper)
    Optional, for color: 4 slices of a yellow-orange cheese, like a cheddar, or as Loden la used, American cheese.
    Optional, butter.*


    Preparation:
    Wash the potatoes and slice into fairly thin rounds, set aside. (Don’t put in pot yet)
    Do all the following and put into one big pot:
    Wash chili peppers. Slice off the stems and slice once, lengthwise
    Wash tomatoes and slice lengthwise
    Peel garlics and smash the cloves with the side of a large knife blade
    Slice beef into bite-sized pieces
    Wash green onions, remove the white part, cut greens into long pieces
    Leave the emma whole, and rub all of it together between your palms
    Crumble all the cheese into the pot
    Cover all the ingredients in the pot with water, just covered.


    Cooking:
    Heat the pot on high, stirring everything  together.
    Stir occasionally, and after about 20 minutes, turn the heat down to medium
    About five minutes later, add your sliced potatoes. (You can turn the heat up a few minutes, then revert to medium)
    Add salt to taste at this point
    The ema datshi will be done cooking after 30-35 minutes total. Just before it’s done, you can optionally add some slices of a colored-cheese, like cheddar, on top, to deepen the color of the soup.
    You’re done!
    Serve with either rice or senkong (see recipe below). If you serve with rice, the ema datshi and rice are traditionally served separately. Note that this soup is correctly quite thin. That’s how Tibetans love it!


    Senkong Recipe*

    Recipe by dorje gurung from anup kitchen:
    To be used with the ema datshi recipe above, for about 6 people.
    Finding the flour for this recipe can be a little challenging, though you have a few options. The basic ingredient Dorje la used is a gray-colored, millet flour, which in India is called ragi flour (also called finger millet, red millet or red teff) or bajri flour (pearl millet). These are all apparently gluten free :-) Dorje la bought some Santos brand ragi flour.  You might try plain millet flour, but the ones we’ve seen are not the right color for a traditional version of this recipe.


    Ingredients:
    Ragi or Bajri flour (types of millet flour)

    Water
    That’s it!


    Preparation and Cooking
    In a large pan or cast-iron skillet, bring 1.5 to 2 inches of water to a boil.
    Slowly drizzle in the millet flour into heaps, creating 4 piles around the pan.
    At first don’t stir the senkong, just let it boil for 4-5 minutes.
    After 4-5 minutes, separate the parts into large chunks while still boiling. (Dorje  used a wooden spatula)
    The senkong will be floating on the surface of the water at this point.
    About 3 minutes later, start splitting up the larger pieces further, and begin to gently stir and turn the mixture, and then turn down the heat to very low.
    After a minute on very low heat, turn off the heat, and keep gently stirring. Your goal is to mix in the flour totally. At this point, you have no piles left.
    Finally, divide your senkong into 4-5 large pieces.
    Serve with ema datshi/churu. Serve the large pieces on the table. People will take a fistful of senkong in their hands, then pinch off a small piece, and flatten it with their thumbs to form a little scoop for the ema datshi soup. (See the end of the video for this process.)
    Enjoy! How many people do you know who have had the courage to cook a Tibetan recipe of a Bhutanese national dish, with a side of boiled millet? You rock!* If you are using pork and labu instead of beef and potatoes, use the same amount of fatty squares of pork (pagsha) with skin, and Asian radish in about the same amount as the potatoes, maybe one or two medium labus.
    ** You can add a little butter if you want even more flavor. If Tibetans see soup without some oil on top, they feel it doesn’t look good, like it’s too much like water (chu lag lag). This is changing in exile, but the older Tibetans from Tibet ate tons of butter.